I really want to thank Russel Fouts of the blog "Pots I Like" for sharing this gem. It's an amazing look into the old St. Ives Pottery in England. http://potsilike.blogspot.com/2008/10/leach-st-ives-pottery.html
Enjoy!!!
Sunday, May 31, 2009
Friday, May 29, 2009
Not a great week... but good
 Well it’s been another good week around the studio. Not great… but good. I’ve been throwing, slipping, and trimming small canisters all week. This time around it‘s 2 to 3 pounders. This is the initial weight of each ball of clay when I initially start throwing it. They seem to generally lose a half a pound or more as they go through the process. The weight is lost in trimming and water weight.
And then there are the lids…lots of them. I throw my canisters first and then come the abundance of lids. 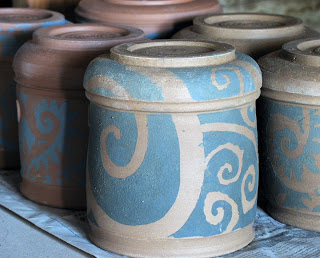
I’m rather particular on their fit, so I usually throw quite a few more than I need and toss what’s not used in to my reclaim bucket. I revisited the lid making process for a new local blog I’m playing with. If you haven’t seen how I make my lids yet, take a quick look. It’s one more approach the making a lid.

I’m rather particular on their fit, so I usually throw quite a few more than I need and toss what’s not used in to my reclaim bucket. I revisited the lid making process for a new local blog I’m playing with. If you haven’t seen how I make my lids yet, take a quick look. It’s one more approach the making a lid.
Sunday, May 24, 2009
Creating a Paper Stencil Part 2
Here is the second part of this weeks demo...
The first part is in the previous post. It shows the technique I use for cutting out 30 to 40 stencils at a time. I do this by cutting my design out of a billet of newsprint sandwiched between sheet plastic using a jewelers saw and bench pin. I can actually get 60 to 80 stencils out a a single billet if I plan my design around the cut, using both the positives and negitves in a design.
This clip shows how I apply the stencils to create a composition. It goes on to show the slip being applied and the paper being peeled away revealing the surface design.
Enjoy!
Saturday, May 23, 2009
Creating a Paper Stencil Part 1
Alright... I know I've shown the process before, but shooting the pictures for these stop motion "how to" videos are how my kids are earning their allowance at the moment and I'm still learning how to put it all together.
This demo is divided into 2 parts. I know I have a hard time sitting still longer than 4 minutes, so I've tried to keep each clip relatively short.
I've got lots of question marks with these videos, but my big question right now is... Does it need sound? I have my stereo blasting Miles Davis and Trombone Shorty while I'm sitting around slapping these videos together, so I assume that everyone else sitting at their computer has their own trax playing in the background.
Self doubt and second guessing always seems to lurk in the shadows, luckily it rarely keeps me from having fun!
Laguna Clay Gallery
Ok, I admit it... I enjoy a good victory. A handful of 'em in a week makes for a good week. They aren't huge... but heck, big... little... victories are victories. It's simply a matter of perspective. Either way I'm doing happy dances!
This week there have been grants accepted, pedestals made, forums found, new friends made, a kiln load readied, gardens planted, sales made, a public bronze pour, throwing demos, lots of new works thrown, and I got accepted into the Laguna Clay Gallery! I'm right after Yoshiro Ikeda. I'm very last in the line-up... COOL!
I really want to thank Jim Gottuso for cluing me into this oppertunity. His work is truly inspirational!
WoW! No picts this time? What's up with that!
Sunday, May 17, 2009
Cone 6 SDSU Texture & Crawl Glaze
 Here is a real cone 6 gem...
25% Magnesium Carbonate
70% Nepheline Syenite
5% Kentucky Ball Clay (OM4)
This is the basic recipe of the crawl glaze that I've been playing with over the past few months. I found it buried in an old sketchbook scrawled in a corner of a page. It was from 8 or 9 years ago during a time when I didn't have any sort of studio access and was sucking up as much information as I could get my hands on. The recipe is attributed to a October 2000 Ceramics Monthly article on page 49, unfortunately I failed to note who the author was. (Hopefully someone can help me rectify that.)
This glaze is very temperamental and you need to place it in the kiln asap after dipping. The glaze will crack and begin to pull away but not quite fall... unless it's disturbed. It's very sensitive to thickness.The glaze will behave very differently based on what's under or over it.
Here's a link to a February post showing some of my experiments... http://fetishghost.blogspot.com/2009/02/test-yumoni-for-crawling-glaze.html
Experiment and have fun and please share any successes or failures you have.
Thursday, May 14, 2009
Throwing AgateWare Yunomi
This is a short stop motion animation video the kids and I shot last weekend demonstrating the throwing of an "agateware" yunomi. This is a simple process of throwing two contrasting clays together to create a marvelously swirled effect directly in the clay body. I finally got around to pasting together a first draft to share....
Wednesday, May 13, 2009
Raku with Bruce


Another fun day spent with Bruce Cadman.

Man... I think that this guy really needs to wear a cape and mask, he seems to have way too much fun!
He did let me put in a piece in the raku kiln to see what might come out. I just sat back and took pictures…

Ahhhhh this is the good life! Where’s my whiskey and cigar?
Saturday, May 9, 2009
Crawl and Soda
 The morning was spent finally posting a handful of canisters into my Etsy shop.
A little cone 6 crawl...


 and a spot of cone 10 soda...
 Now I just wish I could find my stride on writing those darn descriptions.
Thursday, May 7, 2009
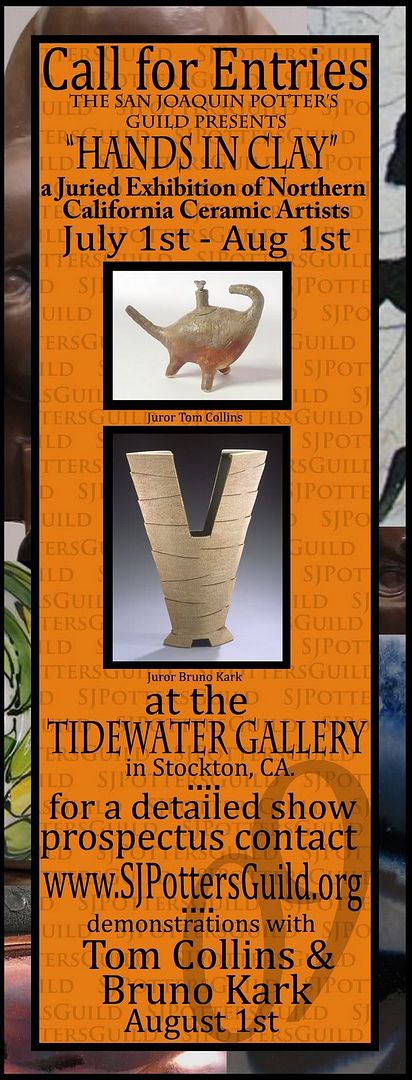
Hands in Clay Exhibition
When times look blue what do you do?
Throw a party!
That’s exactly what the local San Joaquin Potter’s is doing this summer at the TideWater Art Gallery in Stockton California. During the month of July, they will be hosting a juried regional exhibition of Northern California ceramic artists. This is from the same group that created the wildly successful “Visions in Clay” exhibitions so it’s looking to be another fantastic show. This time around, the guild has voted to go back to the basics and accept only hand delivered submissions for this exhibition. Works need to be delivered Friday June 26th from 5pm to 9 pm or Saturday June 27th from 10am to 5pm. The entry fee is $18 per entry for non guild members and $15 per entry for members. All entrants are invited to join. The submissions will then be juried Sunday by guest artists Bruno Kark and Tom Collins. These two amazing talents will return on August 1st for the closing of the exhibition party and to host a daylong 2 man workshop. This will feature demonstrations of some of their studio techniques and promises to be a fun addition the festivities. Cash awards will be presented at the closing.
To read the show prospectus and get more information, go to SJPottersGuild.org
Monday, May 4, 2009
A Quick Look in the Box
 I'm still sorting through and cleaning up works from the latest soda firing while I get caught-up with all of the gardening. There's a good amount of sell-able works, a few racers that I'll pull aside for summer exhibitions, and there is a fairly sizable number of losses. It's a fair trade for a first attempt at soda.


I can only hope the kiln gods are appeased for the next few loads. Matt and I are already anxious planning the next.
Sunday, May 3, 2009
 The story is that this kiln is an old “Wind Kiln” that was contributed to Clay Planet in Sana Rosa, CA. by Steve Davis. It's now a co-op kiln shared among a small handful of ceramic artists in the Bay Area. It’s an approximately 15 cubic foot doghouse coffin kiln powered by 2 squirrel cage blowers. It’s proving to be a very nice and simple design that fires really well in 5 hours or less. Check out Steve’s site for a look at his newer version of this kiln, it's very cool and big. The word is that the sweet spots lurk under the shelving. This is where the soda seems to accumulate really well. I got to fire this critter with Matt Brown of MossBeach Ceramics last weekend with great results. There seemed to be sweet spots all over this kiln! The only cold spot seemed to be the far back, but this most likely had to do with having to switching out the old blowers with new underperforming blowers. No problem... it's just a matter of an adjustment in strategies.
 It's fun being back to the exciting life of living on a new learning curve. This one is rather steep, but Matt and I are already planning the next firing. It's couldn't be soon enough.


Subscribe to:
Posts (Atom)